| NOTE: When assembling your spiral staircase remember at all times that you are assembling a prefinished product and extra care should be taken to avoid damaging this finish. All finishes are carefully checked before leaving the factory and are desgined to withstand all types of normal Use however it is possible to damage these with sharp tools. |
|
You will need: |
| Each
staircase is supplied with an installation video free of charge. This will give you valuable help in installing the staircase. |

| Assemble
the post as shown, screwing the 3 elements firmly together (Fig.1).
A pin can be used as a lever in the holes provided in the pipes. The
top post will have the captive nut at its upper end. Position the
post so that the landing platform is firmly up against the well opening
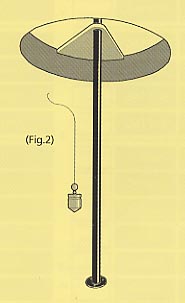
and the post is perfectly vertical (Fig.2) and centred Within the
opening. The easiest way to achieve this is to temporarily fit the
landing platform with a spacer to the post. This can be held temporarily
in position with a length of tape wound around the post to support the spacer. |
| Mark
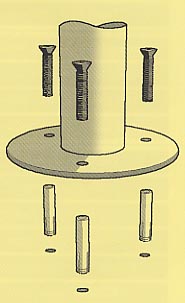
the 3 points on the floor where the post will be screwed into position. Where the bottom of the post is being screwed to a suspended timber floor it may be necessary to add noggins between the joists if the floorboards are not strong enough to support the staircase. Fix the post to the floor using the sleeve bolts for concrete or the coach screws for timber floors (Fig .3). Cover the fixing plate with the cover plate provided, |
| The
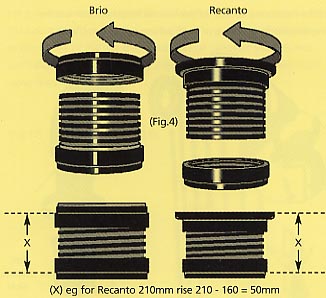
rise of the idividual treads Is regulated using the adjustable spacers. Using the individual rise worked out earlier use (Fig.4) above, to adjust the spacers. Brio: Individual Rise - 170mm = Adjustment Figure Recant: Individual Rise - 160mm = Adjustment Figure Adjust each spacer carefully by turning the spacer ring and using a caliper or steel ruler to accurately set the rise These can be adjusted later if they are found to be slightly out. |
|
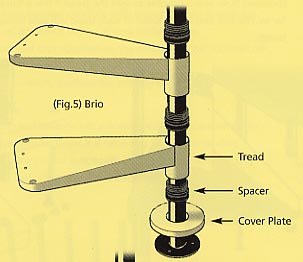
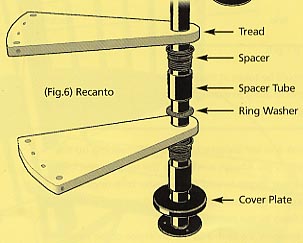
Begin to assemble the
treads alternately with the spacers in the Note that the Recanto
has an extra steel spacing tube and a large ring washer .Carry on
until ail treads and the landing platform are in position. |
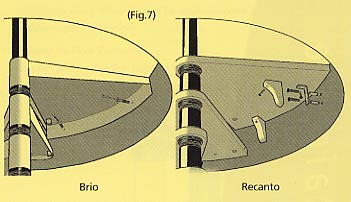
| Fix
the landing platform to the well opening using the bolts/coach screws
provided and timber bracket covers for the Recanto . (Fig.7) |
|
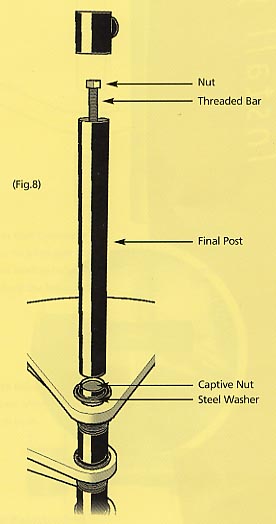
Complete the centre post
by screwing the threaded bar into the captive nut in the centre
post for few turns (Fig.8). |